


Categories
- Raw Wood Veneer
- Paper-Backed Veneer
- Edge Banding
- Vacuum Press Items
- Veneering Supplies
Shop by
Veneer Species
Build Your Own Vacuum Press

Veneer Supplies Newsletter
How to Use Vacuum Bag Breather Mesh
Vacuum pressing just got a whole lot easier.![]()
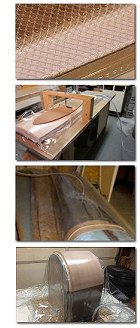 Breather mesh is plastic fabric used inside a vacuum bag that allows air to flow away from the project and towards the vacuum port (also called the "bag stem"). Mesh is typically used in place of a top platen to create even distribution of vacuum inside the bag.
Without breather mesh, vacuum bag material can seal against the veneer/panel creating pockets of reduced vacuum. These areas of insufficient vacuum will not have enough clamping force to adequately press the veneer onto the substrate. Breather mesh helps create evenly distributed vacuum/force inside the bag and this is the key to successful vacuum pressing.
A bottom platen board (typically 3/4" melamine board) is still required when breather mesh is used. Unlike traditional vacuum pressing methods, there is no need for grooves to be cut in the bottom platen board if breather mesh is used with our vacuum bags. The platen board must be at least as large as the project panel. This board is used to provide a flat reference surface which helps to keep the veneer panel from warping while the veneer adhesive is setting up.
Some users prefer to have one platen board sized to fit their bag, and they use that same set up for small and large projects.
Breather Mesh Advantages
- Light weight
- Inexpensive
- Re-usable
- Easy to cut, use, and store
- Reduces bleed-through artifacts
- Does not fatigue the bag material
- Will not stick to most veneer adhesives
- Allows the user to see the veneer as it is being pressed
A Few Words of Wisdom
- Breather mesh can have sharp edges. Some users may prefer to cover the edges of the breather mesh with duct tape.
- The life of the vacuum bag and the mesh can be significantly increased by rounding all the platen board edges with a 1/4" or 3/8" radius round-over router bit.
- Some users mistakenly set their vacuum bag and platen board over a pair of saw horses while pressing a panel. This can be problematic since the platen board can bend under its own weight. It is better to place the vacuum bag and platen on a flat work bench surface instead.
- Breather mesh is typically cut to fit the size of the vacuum bag if most of the user's projects will be flat panels. However, curved projects often require a piece of mesh cut to match the panel size.
- The Questions and Answers tab on the breather mesh product page can be very helpful.
Window Screen Material as Breather Mesh
Window screen material can create a pathway for the flow of vacuum to the bag stem. Several users have reported having no issues with window screen material other than a moderate increase in the amount of time it took to draw full vacuum in the bag. However, it is important to know that a veneer that is not completely flat is not likely to flatten under window screen material. This can lead to lumps permanently forming under the veneer.
The other issue with window screen material is that any adhesive that bleeds through the veneer will smear back onto the surface of the panel. The breather mesh we offer has a wider and more open weave than screen material, so glue that comes through the veneer beads up and can be easily scraped off. Breather mesh is also much easier to slide into the vacuum bag than screen material.
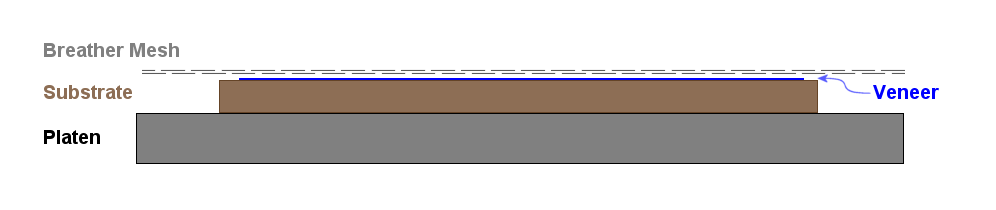
Veneer Placement and Breather Mesh
| Scenario 1 | |
|
Application:
|
Applying the Face and Balance Veneers One at a Time |
|
Veneer:
|
The veneer must be completely flat. |
|
Substrate:
|
The substrate is the same size or larger than the veneer. |
|
Process:
|
Since all panels must have a veneer on both sides, start by applying the balance veneer. This will provide a sense of whether too much glue is being applied. It's better to learn this from the balance veneer than the expensive show veneer. When the balance veneer is finished in the press, immediately work to apply the face veneer in the same manner. |
|
Trimming:
|
The substrate will be trimmed to size after pressing is complete. |
|
Bleed-Through:
|
This setup makes it easy to remove glue bleed-through. |
|
Notes:
|
This method is often the best and easiest way to veneer a panel. |
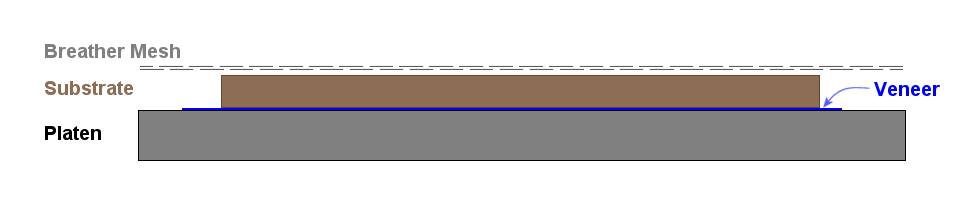
| Scenario 2 | |
|
Application A:
|
Applying a Veneer That is Larger Than the Substrate |
|
Application B:
|
Applying a Veneer When Extra Force is Required |
|
Veneer:
|
This is used when the veneer is mostly, but not completely flat . |
|
Substrate:
|
The substrate is the same size or smaller than the veneer. |
|
Process:
|
Since all panels must have a veneer on both sides, start by applying the balance veneer. This will provide a sense of whether too much glue is being applied. It's better to learn this from the balance veneer than the expensive show veneer. When the balance veneer is finished in the press, immediately work to apply the face veneer in the same manner. |
|
Trimming:
|
The veneer will be trimmed to size with a down-cutting spiral router bit or veneer saw after the pressing is complete. |
|
Bleed-Through:
|
Be sure to avoid excessive veneer glue with this method because bleed-through can cause splotching on the veneer face. |
|
Notes:
|
In this case, the substrate acts as a platen to put additional clamping force on veneers that are not completely flat. Very wavy veneers must first be flattened with veneer softener. |
| Scenario 3 | |
|
Application:
|
Applying the Face and Balance Veneers at the Same Time |
|
Veneer:
|
The show veneer is completely flat and the balance veneer is completely or mostly flat. |
|
Substrate:
|
The substrate is the same size or larger than the veneer. |
|
Process:
|
The face veneer and balance veneer are applied simultaneously. |
|
Trimming:
|
The substrate will be trimmed to size after pressing is complete. |
|
Bleed-Through:
|
This position makes it easy to remove glue bleed-through on the show veneer side of the panel. The balance veneer may not be visible on some projects, so bleed-through is often not a concern. |
|
Notes:
|
This tends to be the fastest way to complete a panel, but you must work quickly to apply the veneer glue and set the veneer on both sides of the panel. You can use clean-release tape to hold the veneer in place. |

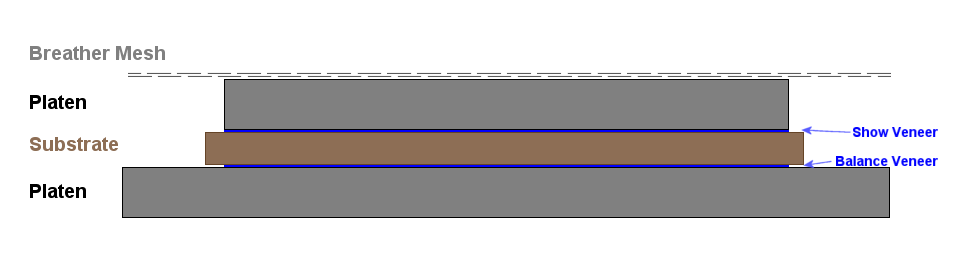
| Scenario 4 | |
|
Application:
|
Applying a Veneer When Extra Force is Required |
|
Veneer:
|
Both the show veneer and the balance veneer are mostly flat. |
|
Substrate:
|
The substrate the same size or larger than the veneer. |
|
Process:
|
The face veneer and balance veneer are applied simultaneously. |
|
Trimming:
|
The substrate will be trimmed to size after pressing is complete. |
|
Bleed-Through:
|
Be sure to avoid excessive veneer glue with this method because bleed-through can cause splotching on both veneers. |
|
Notes:
|
The top platen helps put additional clamping force on veneers that are not completely flat or very thick. It's strange how this works, but you will get the effect of more downward force on the top veneer if a top platen is used. The top platen does not have to be 3/4" thick. If you can find 1/4" melamine board, then it will work just as well. Keep in mind that very wavy veneers must first be flattened with veneer softener. |
The Ideal Set-Up for Most Flat Panels
If you have a small project to veneer, you may not be using the full width or length of the vacuum bag. In this case, insert a platen and place your veneer and glued-up substrate on top. Then place the breather mesh over the entire veneer surface leaving a few inches of over-hang at the edge closest to the bag stem. Position the entire assembly so that the bag stem is above the overhanging breather mesh. This will allow you to evenly distribute vacuum over the veneered panel.
Note that the breather mesh and bottom platen must be larger than the project panel.
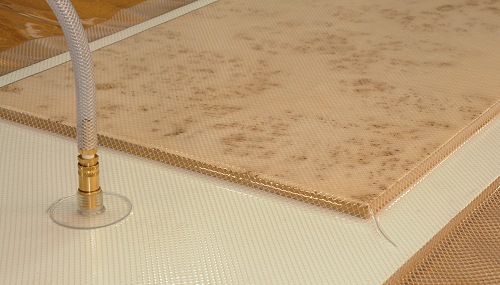
Optional Vacuum Mesh Bridging
The vacuum bags offered on our website have a flush-mount vacuum stem. The stem does not protrude into the bag. Therefore, you can set the project inside the bag with the stem on top of the veneer.
However, if you want to keep the bag stem off the veneered panel, simply cut a 2" x 12" strip of breather mesh and place it between the main part of the mesh and the bag stem as shown in the picture below. The "bridge" piece should lay on top of the mesh that covers the project. This technique bridges the main mesh to the bag stem and acts as a pathway for air to move out of the bag.
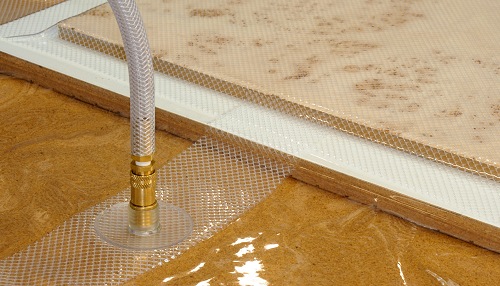
A breather mesh "bridge" makes a pathway for air flow to the bag stem.
Bleed-Through Issues Made Easy
When vacuum is applied to burl veneer or any veneer with voids, small amounts of glue will pull through the veneer face. This is referred to as "bleed-through" and it can be a challenge to remove. With the old-school dual platen setup, the glue that bled through to the face of the veneer was forced to spread out on the surface and created a splotching effect.
However, with breather mesh the glue stays in a tight bead on the surface of the veneer which can be sanded or scraped off with minimal effort. After the excess adhesive is removed, the only glue on the face will be that which has filled any voids in the veneer. This is a great advantage and will give you a smoother finished panel.
The key to preventing bleed-through is to use the right amount of adhesive with a dedicated veneer glue roller. The surface should be completely and evenly coated with the veneer adhesive. When applied correctly, you should be able to see the substrate through the wet glue layer.
To make this as easy as possible, draw a few pencil lines on the substrate before applying the glue. Then use the roller to spread to glue out so you can readily see the pencil lines through the glue layer. At that point, you'll know the right amount of glue has been applied. Even with the correct amount of adhesive, some bleed-through is possible. This is especially true with burl veneers and open-pore species like ash and oak.
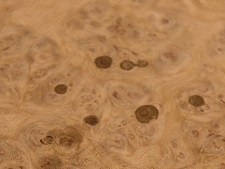 Bleed-through with a platen or caul |
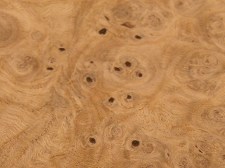 Bleed-through with breather mesh |
Some Final Tips
- Keep in mind that veneer can be applied to the back side of the substrate at the same time that the face veneer is applied to the front, as shown in scenario 2 above. With this method, breather mesh is not used on the back side of the panel since the platen will prevent any air pockets from forming.
- Non-flat veneers over 1/32" in thickness may not flex enough to perfectly mate with the substrate surface when breather mesh is used directly above it. In this case, a 1/2" or 3/4" thick top platen is often a better choice. See scenario #4 above for a diagram of this set up. Grooves must be cut in the top platen as shown on this page or just use breather mesh over the top platen instead.
- Breather mesh may leave small impressions in softer woods such as walnut, redwood, and pine which can typically be sanded off. Reducing the vacuum level can also help. A clothes iron can sometimes be used to raise any impressions left by the mesh. After the glue has fully cured, lightly spritz the impressions with water and then iron them lightly. Be sure to place a piece of cotton or flannel over the veneer surface to prevent scorching.
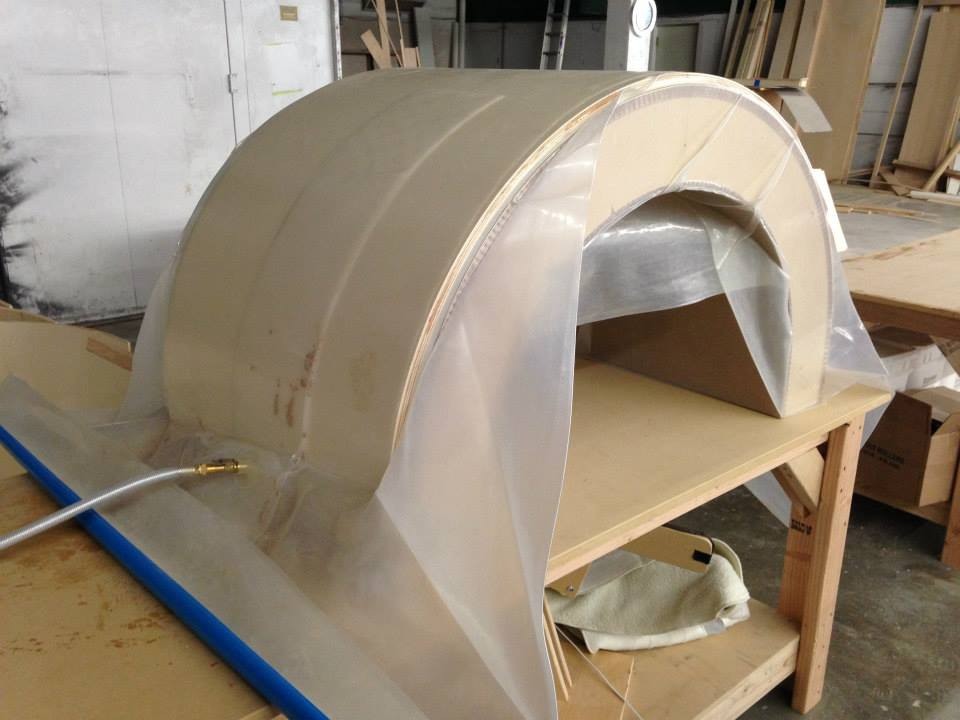
Breather mesh used to make a half-cylinder.
 |
|
 |
|||||||||||||||||||||||||||||||||
All Content ©2026 VeneerSupplies.com™
Terms and Conditions | Privacy Policy | Contact Us
![]()

