


Categories
- Raw Wood Veneer
- Paper-Backed Veneer
- Edge Banding
- Vacuum Press Items
- Veneering Supplies
Shop by
Veneer Species
Build Your Own Vacuum Press

Veneer Supplies Newsletter

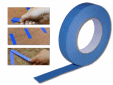

This looks like ordinary painter's tape from the hardware store, but it has a bit of elasticity and that is what makes it different. Most clean-release blue tapes can not be stretched at all, and those that do stretch often have no "memory". In other words, those tapes do not pull back... which is fine for painting, but not very useful in veneer joinery.
This veneer tape uses an acrylic pressure sensitive adhesive. It can be stretched a little and it has excellent memory. It's the perfect combination. The elasticity is critical because it pulls back on the veneer and holds jointed edges tight while the standard veneer tape sets up.
You can control the strength of the "return". In other words, if it's stretched lightly, then it will gently hold the veneer seam tight. Increase the stretch, and it will work more aggressively to pull the seam closer together.
Made in the USA.
Size: 11/16" x 180'
Thickness: .004" (+/- .001")

Instructions: Traditional Joinery Method
- Cut a straight and clean joint line with a veneer saw and a straight edge board.
- Apply the tape across the seam on the back side of the veneer using several pieces spaced 3 to 5 inches apart. Use finger pressure to set the first half of the tape in place on one side of the joint.
- Use finger pressure to hold the starting section of tape in place (from the step above). Then gently stretch the tape across the seam line and press the second half of the tape in place so it can pull the joint tight. If a gap between the two veneers is visible, then lift the tape from one side of the joint and stretch the tape more forcefully before pressing it down onto the veneer. Note that a very large gap may indicate that a veneer edge is not straight and needs to be cut again with a veneer saw.
Note from Joe: Consider experimenting with scrap material to get an idea of how much the tape can be stretched and how that relates to the amount of pull on the veneer seam. It is possible to stretch the tape so much that it causes one veneer to pop-over the other. Obviously that is a bit too aggressive, so remove the tape and try it again with less stretching force.
- The face side of the veneer can be taped with standard veneer tape once the blue tape is applied.
- After the standard tape has set, remove the blue tape by pulling at a low angle and 45° away from the direction that the tape was attached, as shown in the image below. As long as the glue has fully cured, you can use a hair-dryer (not a heat gun!) to warm the tape and make removal even easier.

Instructions: Modern Joinery Method
This tape can also be used on the veneer face to keep seams tight. Traditional water-activated paper tape is not needed with this joinery method. Simply place it across the veneer joint. The force of the tape's "pull" is adjusted by stretching it more or less. It is very easy to apply and remove.
Use the same technique as described above to set the tape, but apply it to the face of the veneer instead of the back side. After the panel has been pressed, carefully remove the tape at an angle as shown in the picture above.
This process works on almost all species, but it's always a good idea to test on scrap materials first. Since this is a PSA tape, removal is more difficult if the panels are clamped with excessive pressure. For vacuum pressing, 21" Hg of vacuum is typically recommended.

Questions & Answers
How much stretch does this tape have?
This tape is primarily used across the joint line in lengths of approximately 3 inches. A three-inch piece of this tape can be stretched nearly 7/32 of an inch. This will vary depending on shop temperature; colder temps reduce its elasticity. If you have to stretch the tape 7/32" to get the joint line to tighten up, then it's best to re-cut the joint line. Pulling this much on the tape can cause one veneer of the non-gapped area of the joint to pop over the other.
Do I use the tape along the seam or across the seam?
If the joint line has minimal gapping, then taping across the seam is all that is typically needed. Some unruly species such as maple, and any layup with veneers that are not completely flat may require tape along the seam, but this is done only after the cross-seam taping has been completed.
How far apart should I place the pieces of tape on the seam line?
It will depend on the flatness of the veneer, the amount of correction needed to get the joint line to stay tight, and the species of veneer. In ideal situations, 4" of spacing seems to work fine. Otherwise, a 2" placement may be necessary.
What is the significance of this tape having an acrylic adhesive?
"Acrylic" means that the adhesive on the tape is water-based, and that is important because solvent-based adhesive tapes can stain the veneer.
What does "pressure sensitive" mean?
The strength of the adhesive bond is directly related to the amount of force that is used to press the tape in place. The bond is literally sensitive to pressure. This is helpful in vacuum pressing because the bag puts a lot of pressure on the tape and increases its bond strength.
Can I use this as the only tape on the panel?
Yes. I was skeptical about this until I tried it many years ago. Now, I don't use standard veneer tape very often in my shop. This blue tape can be used on the top-side of the veneer and then removed after pressing. It works well on most species.
If used as top side tape, will it create impressions in the veneer?
Impressions are possible if the vacuum press is putting too much pressure on the layup, a soft species of veneer is being used, and multiple layers of tape are applied. I've done several panels in walnut, which is a very soft species, at the recommended 21" Hg of vacuum with two layers of tape (one across the seam and one along it) and had no issues with impressions.
If I am using this tape on the back side of the veneer, do I have to remove it before I press the panel?
Yes. Blue tape is used in traditional veneer joinery as a "pre-tape" that is applied to the back side of the veneer before standard water-activated tape is applied to the show side. After that standard tape has dried, then the blue tape on the back of the veneer must be removed.
Is there any other use for this tape?
This tape is pretty good for holding mitered corners together on small projects like picture frames and boxes. Here is a picture from my shop where I used this tape to hold a mitered joint together without clamps. It takes a good bit of pulling to stretch it enough to get that much force.
Product Reviews
-
Awesome Product
Review by Gregg Bahney
Rating:
This is an awesome product and a real time saver versus traditional tape. One thing to consider when using, my shop was quite cold the first day I used it so I placed a heating blanket on the press. The tape came off pretty easy but did leave a lot off residue. I had to use acetone twice and then a good deal of sanding. I am pretty sure it was the heating blanket because I used it 3 more days with the same glue and same veneer and no blanket and it came off very cleanly. I will definitely be using it in the future.
-
Wish I Knew About This Tape Sooner!
Review by Ronnie Davis
Rating:
I'm among the converts of people who stopped using the wetted veneer tapes and just switched to using this blue tape for veneer joinery. I saw it mentioned on a woodworking forum and the a few of the forum members posted pictures of their panel layups with this tape so I gave it a shot. Man I wish I know about this tape sooner. I am so done with wet tapes. This blue tape holds the seams tight and doesn't leave markings or impressions on the veneer. It looks like regular blue tape from the paint aisle at the hardware store but there are random crinkled lines in it which I think are what allows it to stretch and spring back. Removal needs to be done slowly though. If you just rip it off, the tape will shear or the veneer grain will pull up a bit. Go slow and follow the instructions on the website. Also happy to report that this website and its owner are a wealth of great information. The owner responds to emails right away. They also shipped my most recent order (for this tape) within an hour of getting my order. That is incredible!
-
Good Stuff!
Review by Keith Gotschall
Rating:
Easy to see why this is a required item for successful veneering. It's not painter tape. It has a stretch that allows you to easily pull edges together. Will 100% use this over "regular" tape of any kind. Care does need to be used when removing. A session in the bag will really have it set down and you need to carefully find the edge and pull in the correct direction to not pull fibers up as well.
-
Not Your Father's Blue Tape
Review by Jeff Woodward
Rating:
It really is different than [painter's] blue tape. And it does stretch a bit. Super helpful for stitching seams. Just as Joe says. Recommended although not essential. But - why not have the best to do your best?
-
This is the Best Replacement for 3 Hole Kraft Tape
Review by Wade Christifano
Rating:
I have been working with veneers since 1982 and I have used 3 hole kraft veneer tape for most of my project lay ups. Yes it is sometimes a pain to remove that tape but that is just part of veneering. I found a post on a woodworking forum that this tape was better for veneer seams. I tried it out and can say that this is a better veneer tape. It is easy to remove and the tiny amount of stretch it has is great for tugging joint lines together. The tape comes off easy compared to kraft tape, and it doesn't leave impressions on the veneer. On a large layup, the time I spend using tape (applying and removing) is reduced by 75%. I'm happy to report that I will not use traditional kraft tape anymore.
Shipping was a little expensive when I ordered one roll a month ago. But on my order this morning the shipping was very reasonable - though I had a lot of other items on my order. Otherwise, this is a great place to buy veneering tools and veneer. The owner will answer any questions you send very quickly.
-
Great Veneer Tape - No Need for the Water-Activated Type
Review by Jim Schumacher
Rating:
Don't even bother with the brown water activated tape. I just use this tape to hold my veneers together and then peel it off after the project comes out from the vacuum bag. It cleanly peels off of most species. I've done 24 piece sunbursts with it this way!
-
Great Veneer Tape
Review by Craig Hammel
Rating:
Joe is right about this tape being different from painter's tape. It stretches just enough to be very effective holding seams tight. I just bought three more rolls!
-
The Perfect Veneer Tape For My Layups
Review by Martin Wilkerson
Rating:
I've been buying these tape for years from Veneer Supplies. I don't even bother with the kraft water-activated tape anymore for layups. The blue tape stretches enough to hold my seams tight but it's not so sticky that it doesn't come off the veneer very easily. Orders are always shipped very promptly from Veneer Supplies and the customer service here is superb.
-
Great Tape
Review by Andrew Timko
Rating:
Great product! I used to try and make do with painters tape and veneer tape, but always fought it. Tried this stuff and my life has changed. I have gotten into chessboards recently which doesn't seem difficult, however perfect alignment for a great project is important. This helps me to pull in those fine veneers that may not want to play nice well for a great glue up. I am very happy!
-
I Recommend It
Review by Dave Johns
Rating:
Good stuff, shipped and received on time and without any damage. The website description was also accurate and fair. I would recommend this product to anyone interested.
-
Well Worth Having
Review by John Laupheimer
Rating:
This does just what it says. It pulls veneer pieces together temporarily while you paper tape the face sides. The tack is enough to hold but still is easy to remove. Well worth having on the shelf. It is also good for light clamping use on boxes and the like.
-
A Believer In This Tape
Review by Dave Agostini
Rating:
This is the first time I used this tape for a veneer project. I have previously used regular blue painter tape. But, I love this tape! It far out performs the regular old blue tape.
-
Will Order More!
Review by Ken Gebhardt
Rating:
It does take a little time to get to know exactly how to work with this but once you know it pulls seams together and comes off easily. I will buy this again it's that good!
-
Great Tape
Review by Mark Parker
Rating:
This stuff is great! Just the right amount of stretch and stick. I used it for book-matching veneer and then put regular veneer tape on other side. When that was dry, I removed the blue tape. Removes easily too.
-
Good for Gluing Binding and Purfling Too
Review by Larry Fisher
Rating:
While this tape is excellent for taping veneers together, I mainly use it to glue the binding and purfling on my harp soundboxes. It's strong, flexible and is the best that I've used.
-
The Perfect Blue Tape
Review by Robert Stewart
Rating:
This is the perfect tape for veneer! I should have known that Joe would have this item. It works exactly as described and has the perfect stretch factor.
-
Perfect for Real Wood Veneers
Review by Aaron Saxton
Rating:
I had cracked veneers that had dried apart...regular veneer tape just couldn't hold it properly. It would take forever to get the tape dry enough for each staple to hold anything - and even then it as too stiff. This tape however, did the job. It has just enough tension to "pull" the pieces together and is strong - and comes off remarkably easier than regular tape. Wish I had this tape a long time ago.
-
What more could you ask for?
Review by Bob Cole
Rating:
I have been using many types of "blue" and "green" tape with my veneers for quite some time. Since I ordered, and used, this tape I use no other. I highly recommend its use. It "pulls" veneer edges together and leaves no residue. What more could you ask for?
Shipping Discounts

Also Recommended

Your Wish List
 |
|
 |
|||||||||||||||||||||||||||||||||
All Content ©2026 VeneerSupplies.com™
Terms and Conditions | Privacy Policy | Contact Us
![]()

