


Categories
- Raw Wood Veneer
- Paper-Backed Veneer
- Edge Banding
- Vacuum Press Items
- Veneering Supplies
Shop by
Veneer Species
Build Your Own Vacuum Press

Veneer Supplies Newsletter
Vacuum Breather Mesh/Net

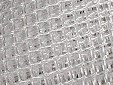

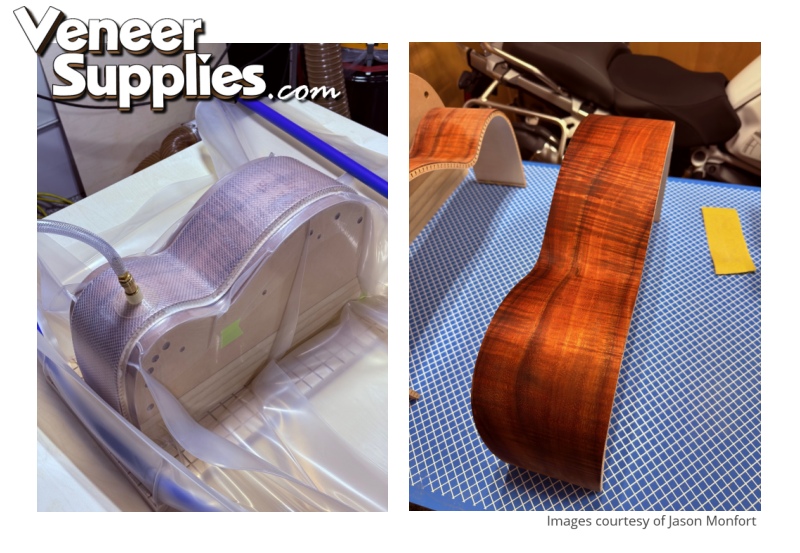
Success in vacuum pressing starts with creating an even distribution of vacuum on the project surface. Breather mesh makes this easy. This polypropylene fabric is placed under the vacuum stem on the bag and over the entire project surface so that air is removed quickly and vacuum is created evenly. Mesh prevents the trapping of air pockets inside the bag that always lead to bubbles.
 Breather mesh eliminates the need for a top platen board, which can often be heavy and difficult to set over a project panel. It also allows you to use a bottom platen board without vacuum channels/grooves. This mesh is also a must-have item for curved work and bent laminations.
Instructions: How to Use Vacuum Bag Breather Mesh
Thickness: .046"
Origin: Made in the USA

Spend Some Money, Save Some Money
Breather mesh is not a one-time-use product. It is very durable when used correctly. However, give some thought to ordering a bit more than you need so extra mesh is on hand if it gets stretched beyond its limit during use. This material costs less per foot in the longer sizes, and the shipping cost of the 48" widths of breather is the same regardless of the length that is ordered.
![]() The 50" length of this product's box triggers a surcharge by FedEx, which can make shipping a bit expensive. Shipping by USPS may cost less. Our website will show both shipping options if both are available.
The 50" length of this product's box triggers a surcharge by FedEx, which can make shipping a bit expensive. Shipping by USPS may cost less. Our website will show both shipping options if both are available.


Why Use Breather Mesh?
Breather mesh not only reduces bleed-through problems on open-pore and burl veneers, but it also makes the bleed-through areas much easier to clean up. When breather mesh is used you will find that the glue stays in a tight bead on the surface of the veneer which can then be easily sanded or scraped off. After the excess adhesive is removed, the only glue on the face will be that which has filled any voids in the veneer. This is a great advantage and will give you a smoother finished panel.
 Bleed-Through without Breather Mesh |
 Bleed-Through with Breather Mesh |
 Other Breather Mesh Advantages
- Reusable
- Light weight
- Very flexible
- Inexpensive
- Can be cut to size
- Easy to use and store
- Simplifies curved veneer work
- Does not fatigue vacuum bag material
- Allows the user to see the veneer as it is being pressed
Important Notes
- The mesh may have sharp edges, but it will not damage the vacuum bags we offer. Exercise care when handling breather mesh to avoid scrapes and cuts. It is advisable to wear appropriate work gloves while working with this mesh.
- Non-flat veneers over 1/32" in thickness may not flex enough to perfectly mate with the substrate surface when breather mesh is used. In this case, a 3/4" thick top platen is often a better choice. You can cut grooves in the top platen or instead use breather mesh over the top platen.
- The mesh has a melting point of 363°F and a softening point of 305°F.
- A bottom platen board is still required when breather mesh is used, but there is no need to cut grooves in the platen with this method. The beauty of breather mesh is that it simplifies the vacuum bagging process. The platen is only used to provide a "reference" surface which keeps the panel flat while the veneer adhesive is setting up.
Questions & Answers
Where can I learn more about breather mesh?
We've written a detailed page about using breather mesh on this page.
Do I need several sizes of mesh for each size project I put in my vacuum bag?
Most people have one piece of mesh that matches the size of their vacuum bag. This way, no matter what size your project is, if it will fit in the bag then the mesh will fit too.
Can the mesh be cut?
Yes. The mesh can be trimmed to size with a pair of scissors.
Do I cut the mesh to fit my project or to fit my vacuum bag?
Generally speaking, it is best to cut the mesh to fit your vacuum bag if the veneer panels you create will be flat. For curved projects, custom-sized breather mesh is often required.
What can I do if my mesh gets creased?
Some users have reported that creases can be ironed flat with an ordinary clothes iron on the medium heat setting. Do not place the iron directly on the mesh! Set a piece of cotton or flannel fabric on the crease and then iron it. This should prevent the mesh from melting.
Is a top platen board needed when using breather mesh?
If the veneer is flat, the mesh will press the veneer against the substrate without the need for a top platen. If the veneer is not very flat, a top platen (with breather mesh over it) can often help put more "pressure" onto it and force it flat.
Does the bottom platen board require air channels/grooves?
If the bag's vacuum port is on top, there is no need for grooves in the bottom platen. There simply isn't enough free air between the bottom platen and the bottom of the bag for grooves to make a difference.
What should I use for a platen board?
You'll find that 3/4" thick melamine board is excellent because most veneer adhesives will not stick to it. You can find this material at large hardware stores like Home Depot and Lowes. It is usually in or near the plywood aisle.
How do I get the mesh into a long vacuum bag?
There are two common ways to get the end of the mesh into the far end of the bag. One option is to insert the mesh (after the platen is set in the bag) using a broom handle or dowel with duct tape wrapped sticky-side-out around the end. Use the stickiness to grip the mesh so it can be pushed to the end of the platen board.
 A more permanent option is to use #6 x 3/4" screws with small washers to secure the mesh to the leading edge of the 3/4" thick platen board. The screws/washers should be 6" to 8" apart. This allows the mesh to go into the bag as the platen board is inserted.
Start by cutting the mesh to the exact width of the platen. Then line up the side edge of the mesh with the side of the platen board. Use masking tape to temporarily hold it in place on the left and right side of the platen. Leave about 3/4" of overhang at the leading/forward edge of the platen. Then fold the mesh over the leading edge and use the screws/washers to secure the mesh to the edge of the platen.
How many times can the breather mesh be used?
The mesh should last for a very long time. I suspect that the mesh piece that I use in my shop has been used for more than 100 panels.
Will the veneer glue get trapped in the mesh and ruin it?
Glue that squeezes out from under the veneer will stick to the mesh. Larger blobs of regular veneer glue will typically release from the mesh if the material is flexed a bit. Small blobs will also release, but I don't bother to remove them since they do not reduce the effectiveness of the mesh.
Can I use window screen material instead of breather mesh?
Yes and no. Window screen material can create a pathway for the flow of vacuum, and several users have sent messages saying they had no issues other than a moderate increase in the amount of time it took to draw full vacuum in the bag. It is important to know that a veneer that is not completely flat is not likely to flatten under window screen material; you can get lumps in the finished panel. The other issue is that any adhesive that bleeds through the veneer will smear back onto the surface of the panel. Our breather mesh has a much wider/open weave than screen material, so glue that comes through the veneer (especially for porous species and burls) beads up and can be easily scraped off. I've also found that breather mesh is much easier to slide into the vacuum bag than screen material.
Will I get excessive bleed-through with mesh?
Some bleed-through is a good thing. Small beads of glue that come through the veneer are a sign that the right amount of glue was applied to the substrate. Let those beads dry and then use a cabinet scraper (aka card scraper) to easily remove them. Porous species like walnut, mahogany, and oak will allow more bleed-through to occur. Other species such as maple and beech typically do not bleed-through.
If too much glue or too much vacuum (more than 21" Hg) is applied to the project, you might get quite a bit of bleed-through. This is not a fault with the mesh, and a panel with too much glue is likely to cause issues even if mesh is not used. Reduce the amount of glue and, if necessary, decrease the vacuum level on your bag to minimize bleed-through issues.
Why is the mesh not sold in a 54" width to match the size of the larger vacuum bags?
The manufacturer does not yet have the capacity to build the mesh any wider than 48 inches. Each time I order rolls of mesh, they tell me that they are continuing to add machinery and technology to improve on this width, but I've not yet seen any results.
Will the breather mesh protect the vacuum bag from sharp corners on the veneer panel?
Generally speaking, yes; the mesh offers some degree of protection. The amount of protection depends on the angle of the corner, the age of the bag, and the amount of vacuum being applied.
What if my project is wider than 48"?
Simply order enough mesh for two side by side pieces that you can lay inside the bag. Some users have reported success by joining the two pieces with duct tape.
From what material is the mesh made?
Our mesh is currently made from polypropylene.
Why is this stuff so expensive?
It is my opinion that the cause is simply corporate greed. The only manufacturers of this material in the US have all been bought up by a giant corporation. Since they have monopolized the supply of this product, they have raised the price well beyond what I could have ever imagined.
How do I prevent the mesh from imprinting the veneer?
There are only two causes of markings left by breather mesh, and both are easily preventable. If there is too much glue on the substrate, the veneer will float on the adhesive surface and the mesh will create quilt-like markings. Obviously, the key is to use less glue.
The rule of thumb is that the surface of the substrate should look evenly painted with veneer glue. It should not be dripping wet. A good test is to place a pencil mark on the substrate and apply the glue. If you can barely see the pencil mark on the substrate (through the adhesive), you have the right amount of glue.
The second cause is too much vacuum. It's a good idea to lower the vacuum level to 17" Hg on softer woods like walnut and redwood to prevent markings from the mesh.
Will epoxy stick to the breather mesh?
Yes.

Product Reviews
-
Does What It's Supposed To Do
Review by Jim Davis
Rating:
Breather mesh performs a pretty simple task, but this one works well. I went with 180" length so as a hobbyist, I should be set for life. As usual, shipping was as fast as you could want.
-
Improves Workflow and Efficiency
Review by Matt Vredenburg
Rating:
I have used vacuum breather mesh on all of my veneer projects for five years and find it helps simplify the veneering process. No more specially cut-top panels lying around the shop collecting. I highly recommend this product to anyone serious about improving their workflow, reducing material waste, and increasing efficiency.
-
Buy this mesh!
Review by Robert L. Cole
Rating:
I resisted trying this product for years. Big mistake! I am a casual user of wood veneer and using this mesh has been an eye opener for me. When working alone it is much easier inserting anything into the vacuum bag, there is significantly less "bleed through" of glue. The glue tends of set into a bubble and is easier to scrape off as opposed to sanding. I exclusively use this product now and I am much happier doing so.
-
It Just Works
Review by George Popov
Rating:
Such a simple concept, but it works so well. I experimented and tried using only the mesh without a platen (not recommended) and it seems to work just as well.
-
You'll Wish That You Had Bought This
Review by Jonathan Danforth
Rating:
Go ahead and get this stuff. The netting is just the right thickness to be pliable and adjustable while still allowing the air to flow around and through it. Do be attentive to how much pressure you apply with your vacuum pump. Soft woods can easily be dented by excessive vacuum.
I cut this with scissors easily enough. I don't think that you need gloves to use this but you may want to fold-over some gaffing tape or similar to the edges to make it easier to handle. When not in use, I roll this up and jam a bamboo skewer through the middle. Rubber band probably works great too.
-
Well Worth the Cost
Review by Terry Therneau
Rating:
The material is the right stiffness to easily place in right position in the bag, and yet easy to cut with a good pair of scissors. Well worth the cost.
-
First Time Use - No Issues
Review by Ted Turner
Rating:
This was my first attempt at vacuum pressing veneer and I did not have any issues.The product works as advertised! I'm glad I chose Veneer Supplies. Joe did an outstanding job of shipping the product. Thanks!
-
Does the Job Well
Review by Phil Roybal
Rating:
This is nice mesh, relatively bare-hand friendly, easy to cut and place, and does the job well. It can save the trouble of cutting grooves into your platens to allow for air flow.
-
Responsive Vendor, Excellent Product at Fair Price
Review by Fred Van Etten
Rating:
Prior to purchasing, I had a question about which size to purchase - got an email response the same day. The mesh is excellent quality at a fair price. Shipping was very fast.
-
A Worthy Purchase
Review by Garrett Roberson
Rating:
I ordered this mesh to help with a larger glue up of veneer on a kerf bent buffet base. Another thing I hadn't thought of when ordering is the ability to trim it. I ordered a larger roll which is great but because my glue up was long and narrow and curved I really just needed about a 4" wide strip that was about 9 foot long. The mesh trims easy with sheers and works really well.
-
Great Product
Review by Carter Whyte
Rating:
Easy to cut, I took the time to wrap the edges with duct tape but have no doubt in my mind the bag would easily stretch/not tear if they weren’t. Great product and great air distribution.
-
Good Product
Review by Wayne Seyler
Rating:
This product was very helpful in clamping my project in the bag. I did notice that it left a slight impression on my veneer that I had to sand out. It may be that I needed to us a platen board on the top of the veneered piece as well as the bottom.
[Note from Joe: Softer species of veneer can typically be pressed at a lower vacuum level. The write of this review did not state what vacuum level he used, but for softer species, I typically recommend 18" Hg instead of the normal 21".]
-
Awesome! Works Great.
Review by Michael Reynaga
Rating:
Works really well. I'm new to veneering and this mesh really makes a big difference in terms of making sure the nozzle doesn't immediately suction against one spot. The mesh made sure the entire bag vacuumed out and pressure distributed well. My first project was a success!
-
100% Successful
Review by Rob Hughes
Rating:
After a year or two of reading about vacuum clamping on the net I purchased the V4 Press Kit, VS Extreme bag, breather mesh and Ultra Cat glue. Any questions regarding what to purchase were promptly answered and after purchasing the products I was kept informed regarding delivery dates.
The products arrived in excellent condition, and the V4 kit went together easily. The parts are of exceptional quality and the instructions are brilliantly written.
The bag is robust yet flexible, easily conforming to complex shapes. My first attempt at vacuum clamping was 100% successful, no leaks, and easily handle by my pancake compressor.
5/5 stars for customer service, product design, value, and overall experience. Thank you.
-
Great Innovation for Ease of Vacuum Press Operation
Review by William Butcher
Rating:
This mesh works perfectly. It is durable and well constructed. This product great simplifies vacuum press operation and offers great flexibility in use and application.
-
Makes Clamping Easy
Review by John Laupheimer
Rating:
The mesh makes bag clamping easy and saves having another platen in the bag and the worry that it might stick to the veneered surface. It cut easily.
-
Works as Intended
Review by Stan Blaszczyk
Rating:
Works as intended. Easy to manage. It makes sure you have good air flow over part and eases corners so it does not puncture the bag. Overall Veneer Supplies was quick to ship and are great to work with.
-
Necessary Product for Vacuum Bagging
Review by Shane Burkhart
Rating:
Works great for air evacuation from vacuum bag. Negates the need to cut grooves in platen to ensure complete air evacuation when using vacuum pump. May leave slight diamond marks on veneer under higher vacuum pressure but easily removed with light sanding or one can put veneer face down on platen and mesh over base.
[Note from Joe: At 21" Hg vacuum which is the recommendation level for veneer work, only the softest veneer species have issues with mesh impressions. Reducing vacuum to 17" Hg is fine for this veneers.]
-
Convenient and Effective
Review by Matthew Offenbacher
Rating:
So much better than maintaining a platen! The mesh does what it says - super helpful since you can roll it up and keep it out of the way when you're not using it. This is much easier to handle and you can use anything as your platen instead of leaving a dedicated slotted sheet and moving around all the time.
-
Easy to Use and a Great Solution
Review by Marco Cecala
Rating:
With a thick bag, using mesh will allow a tight connection to the material for consistent results. Even with cauls, we use breather mesh to eliminate voids.
-
Quality products
Review by Ken Stewart
Rating:
These people sell quality items. Ships right out. Good people to deal with and I recommend them for all your veneer products. They answer your emails right away and answer your questions.
-
Excellent Service
Review by John Becker
Rating:
Excellent product at a great price. Excellent company. Super fast shipping. Great packaging. What more can you say? Definitely will buy from Veneer Supplies again.
-
Breather Mesh and Customer Service are Both Great
Review by Nelson Scott
Rating:
Product worked great and can’t say enough about the excellent customer service. Far beyond any other company I’ve dealt with. So much so that I return for several repeat purchases even though others offered the same or similar products. Will absolutely be making more purchases in the future.
-
No more air pockets!
Review by Gary Spodnick
Rating:
I'm new to vacuum pressed veneering but this is a super-cool product. I have done a bunch of veneering before using clamps, cauls and plattens and have always had problems with air bubbles or incomplete adhesion between the veneer and substrate, especially on larger panels where it is difficult to get adequate clamping pressure in the center of the piece. I have only used this product once so far on some test runs, but the veneered panels came out perfectly with no trapped air pockets. The mesh completely eliminates this from happening.
-
Works for Me
Review by Dave Boling
Rating:
Used a 5"x5" piece in conjunction with a slotted platen and positive mold, and the vacuum bag pulled down much faster than the previous time without the mesh. Planning on trying it out on a larger flat piece in the near future.
-
Easy, Quick, Essential!
Review by Matt Hill
Rating:
Purchased enough to setup common veneer layup sizes for my area and am impressed with the quality of the material. Love how simple the process is with these sheets over the double platen method. I can’t wait to try curved veneering!
-
Great Stuff - Worth Every Penny
Review by Evan Fales
Rating:
I haven't done any veneering before so I can't say how this compares to other meshes/platens, but it works great right out of (er, in) the bag. Will be interested to see how it handles curved surfaces. I've used it on some beautiful Tamo Ash veneer from Joe, which bleeds EVERYWHERE, but it was easy to remove the bleed-through by lightly scraping with a card scraper. Joe & Christine sent it to me rolled up even though I hadn't requested it.
-
Should Have Bought It Sooner
Review by Matt Gerber
Rating:
I was using a top plater for a while before I bought this and now I wish I bought it sooner. Good quality and makes the vacuum bag process much simpler
-
Great Product!
Review by Meyer Wells
Rating:
My order arrived quickly and in great condition. I'm not one of the guys who works on the veneer but they specifically requested THIS mesh from THIS seller. We're a high-end commercial and residential furniture maker so they wouldn't ask for it if it wasn't quality. Thank you!
-
Excellent Mesh -Indicative of Excellent Customer Service
Review by John Maxwell
Rating:
Used breather mesh to press a fairly complicated pattern on a 3 x 5 table top and it worked great. As many reviewers have said, it's very nice not to have to deal with a top platen, especially on a medium/large piece.
But my bigger comment is really one about Joe and Christine and it pertains to everything I've bought from them (which is basically everything to enable veneering including the vacuum press, starter kit, mesh, veneer, etc.) It would be hard to imagine better customer service. It's not "just" that the products offered are of high quality and very reasonably priced. The accuracy and thoroughness of the advice AND the cheer and genuine interest with which it is offered is really special.
For someone like me, with significant hobbyist experience in woodworking generally, but none until now with veneering, that advice/attitude has been the most valuable thing, without which I doubt I would have gotten into veneering in the first place. That kind of treatment is more and more rare so when one sees it, it bears commending.
-
Great Product
Review by Wayne Delyea
Rating:
I bought the breather mesh because I have been using it for several years and needed a larger piece for the marquetry table top I was making. First off this is a big improvement over the old style mesh I had. The mesh is tighter and seems more flexible than the old one. I'm well pleased.
-
Just what I needed.
Review by Rick Vreeke
Rating:
This mesh material is pretty good stuff. I read some online suggestions that said you can use most anything including window screen material,etc. After spending time looking around the hardware store I decided to simply buy what Joe recommended. I'm glad I did for the all the reasons he gives. It's reusable, easy to store in the vacuum bag, it's transparent, can be easily cut to the proper size. I figure I didn't need to reinvent the wheel.
-
Breather Mesh Does Exactly What Its Name Is!
Review by Robert Laughton
Rating:
Great product I was not using a mesh when I was vacuuming my veneers and they were coming out with a lot of glue bleeds but when I started using the breather mesh they have been coming out great and with a more even bond. Would recommend this to all!
-
Vacuum Breather Mesh is a Must-Have Part
Review by Steven Parker
Rating:
You need this if you want great results in vacuum pressing, no question! This mesh is a must-have part of vacuum pressing.
-
Good Product
Review by Dale Scott
Rating:
Good product and easy to use with the vacuum system.
-
Great Products, Great Service
Review by Peter Roth
Rating:
This is a great product. Much better than having to make a channeled platen. But even better than the product is the service. Quick shipment, good communication. And the how to info is the best anywhere.
-
Buy it!
Review by Aaron Pirwitz
Rating:
As always Joe ships fast! No more need to make a platen for individual pieces. A must for curved projects. Worth every dollar!
-
Review from The Netherlands
Review by Kim Hoogeveen
Rating:
This product arrived very fast. Great product for my work. Thanks Joe for the good service!
-
Breather mesh is a must.
Review by Mel Dahlberg
Rating:
Love the breather mesh. It really reduces the potential wrinkles in the vac bag.
-
Exactly as Advertised
Review by Dominic Nepa
Rating:
My breather mesh was expertly packaged (order it rolled) and be able to get right to work, arrived quickly, and worked exactly as advertised. I can’t imagine having to deal with 2 platens! Pressed a 4’x8’ ellipse table top with ease.
-
Works Great
Review by Wayne Delyea
Rating:
The breather mesh works great. The ability to do without the top platen is a back saver for me especially when you have a short time to get everything into the vacuums press and the plate a are 25 lbs each. Joe did a great job of getting my order to me immediately so I could get my work done in a timely manor. Be sure to ask for it to be shipped rolled vs folded so it is perfectly flat. Great product thanks Joe!
-
Review from Omaha, NE
Review by Mark Gutierrez
Rating:
This product arrived in perfect condition. I paid attention to the instructions on the web site and received the mesh rolled instead of folded. I really appreciate this website. Everything you need for veneering.
-
Review from Eagleville, PA
Review by Mike Mastro
Rating:
You can't go wrong dealing with Joe. Everything is just as described on the website and the service is great! Everything is packed beautifully and shipped the most cost efficient way. And if you are new to all this you came to the right company because they will help you through anything! Thanks Joe!!!!!
-
Review from Goffstown, NH
Review by Brian Vaillancourt
Rating:
Recently built a relatively large (3'x6') vacuum frame press. Initially used MDF as a platen with dado slots for air evacuation under the workpiece, I could not achieve a leak free design.
My solution was to use melamine as a platen, with this breather mesh both above and below the workpiece. Excellent performance with air evacuation and no more leaks.
Save yourself a bunch of time and frustration and go for a bit more of this mesh.
-
Review from Richmond, VA
Review by Evan Morris
Rating:
Using the mesh has made getting a perfect application much easier. The only drawback I've experienced is sometimes with a softer veneer, an impression of the mesh is left in the surface and must be sanded out. I started using a layer of screen (cheap fabric, not metal screen) between the mesh and the veneer, and I haven't any extra sanding since.
[Message from Joe: On most veneers, you can lower the vacuum level to 18" Hg to resolve this issue.]
-
Review from Snohomish, WA
Review by Ralph Penton
Rating:
I do a fair amount of veneering in my shop and have for years. I purchased the 48" X 120" mesh from Joe based on the description which made a lot of sense. The product far exceeded my expectation as it sped up the clamping process by eliminating handling a second platen. I used it a couple of times for large panels and already have ideas how I can turn out a better finished product without the hassle of an upper and lower platens. It's inexpensive and allows you cut pieces that can "snorkel" the vacuumed air assuring a wrinkle free finished product. It's well worth the few bucks that it costs! Your end result will be more consistently bonded for sure.
-
Review from Kittery Point, ME
Review by Bruce Grimes
Rating:
I received my order in great shape and can't wait to use the breather mesh. Mine was folded, but I've laid it out and I don't see any issues when I go to use it. Working with VeneerSupplies.com has been very easy. Joe is a great help; especially to someone with little veneering experience. Looking forward to doing business with Joe and his company in the future. Best regards!
-
This Stuff is Awesome
Review by Earl Cowles
Rating:
The breather mesh should be accompanied with ALL bag sales as it only makes sense to use it. It makes the whole veneer press process a lot easier. I recommend buying a large piece and cutting it down into smaller pieces as your projects dictate.
-
Happy Buyer!
Review by Ernie Cardin
Rating:
This breather mesh is superb. Its re-usable and it works. I've ordered from this website many times and the speed which they process an order is amazing. When I first ordered my vacuum press, I had a shipment notification and tracking number within an hour!
-
Great product
Review by Nicolas Goodman
Rating:
There isnt more I can add to the existing reviews other than to say that this mesh has changed the way I look at a veneer project. I used to look at a project and wonder how I would ever get the bag to lay flat on the surface without creases. I had trouble on any complex surface understanding how I would make the bag lay correctly where I needed it to be. A friend of mine had bought some imported hand pump and vacuum bag and it came with a "mesh" that looked like something that a sack of fruit would be pacakged with. After it failed him, he bought the mesh from here and never had to replace it. I tried it and it changed everything. From that point on, I was so not afraid of vacuum pressing a contoured shape that I started making projects for a local company because they could not figure out how to veneer the shape on their own.
Im not sure what else to say. This is a good item to have if you do any vacuum work at all.
-
Breather Mesh - Does What It Should
Review by Gordon Werner
Rating:
A lot of problems can happen if you dont use breather mesh. I've used the mesh sold here and several other meshes. This one is the best by far. Its very re-usable and that makes it more cost effective than the junky mesh sold by lesser companies.
You wont find a better way to vacuum press a flat or curved panel anywhere and you wont find a better mesh any place other than here. I highly recommend this no matter what kind of veneering you do.
-
Very Happy with My Purchase
Review by David Moreland
Rating:
For 3 years, I've been using a platen on top of my veneered panels in the vacuum bag. It works fine but it can be tedious. On the suggestion of a friend I tried this mesh and I have to say its well worth the cost. I've been using the same piece of mesh for the last 20 projects and it still gives me great results.
One suggestion, buy the largest piece offered because you'll end up cutting some of it down to various sizes if you have more than one vacuum bag. It's a bit cheaper to buy this way.
-
Great Productivity Aid
Review by David E
Rating:
I use a vacuum press instead of a vacuum bag. This has the vacuum port at the end of the press. Using Breather mesh over the top platten I do not need one that is cross groved and running a strip of breather mesh from the port to the top of the project eliminates any positioning issues and ensures full pressure to the project.
-
Great Product Very Useful
Review by Kirk Davies
Rating:
Great product to use in lieu of cauls etc. Can't find anything comparable. Produces great results on vacuum veneer items.
-
Happy to have found this one.
Review by George Jones
Rating:
I knew something like this must have existed. I searched every catalog I have and I spoke with every woodworker I could find (no one really understood what I was talking about).
I guess I dont need to repeat what the description says. Its self explanatory. But I will say that it does work nicely and its completely reusable.
My order arrived very quickly and the shipping was ok. What surprised me most is the quality to price ratio. This is a good deal for what it does considering its cost. This is another case of "its not what it IS... its what it DOES".
I will definitely be recommending this to my fellow woodworkers who are veneering their projects.
Shipping Discounts

Also Recommended
-
 Lock-On Vacuum Connector $11.50
 -
 Simple Vacuum Bag Closure $14.90
 -
 Bag Stem Assembly
Flush Mount $20.70
Your Wish List
 |
|
 |
|||||||||||||||||||||||||||||||||
All Content ©2026 VeneerSupplies.com™
Terms and Conditions | Privacy Policy | Contact Us
![]()

