


Categories
- Raw Wood Veneer
- Paper-Backed Veneer
- Edge Banding
- Vacuum Press Items
- Veneering Supplies
Shop by
Veneer Species
Build Your Own Vacuum Press

Veneer Supplies Newsletter
Veneering Tips
How to get a perfect panel every time...![]()
No matter how many times you have veneered a panel, there's almost always a bit of worry when you pull a veneered panel out of the press. Maybe you start with a quick prayer or just cross your fingers while you wonder if there will be bubbles, ripples, delamination, or seam separation. Here are a few tips to ease the worry and avoid the most common mistakes when working with veneer.
1: Store the Veneer Carefully
Burl and crotch veneers can be stored in anything that will minimize changes in moisture content. Plastic "cling" wrap or even a trash bag can be used for this purpose. Long wood veneers are typically rolled up for shipment. Exercise care when opening a roll of wood veneer. Don't let the veneer get out of hand and spring open. Ideally, these veneers should be stored flat between two pieces of plywood or MDF and then placed on a shelf. This method of storage minimizes rapid changes in moisture content and prevents color fading caused by exposure to UV rays from sun and fluorescent light. For both burl and long wood veneers, it is helpful store the veneer flat and preferably with evenly distributed weight on top. Learn more about storing veneer on this page.
2: Prepare the Surfaces Properly
Many substrates require a quick scuff sanding with 60 or 80 grit sand paper. This is especially true for MDF, MDO, and some types of plywood. The substrate surface must be porous for most water-based adhesives to bond.
For paper-backed veneer
Test the back of the paper backed veneer by applying a single drop of water to the backing. If there is still a bead of water after 5 seconds, then the backer could create a problem with water-based adhesives. There can be a significant benefit from scuff sanding the backer with 80 or 100 grit sandpaper. This will allow the moisture in the veneer glue to transfer the bonding polymers to the paper backing and help ensure a durable bond.
For raw wood veneer
Most raw wood veneers do not need any special preparation. The two most notorious exceptions are oily exotic species and maple. Some of the oily exotics will adhere better if wiped with naphtha just before application of the veneer to the substrate. For maple, it's a good idea to scuff sand the back of the veneer with 60 or 80 grit sandpaper to get a proper bond. Proceed slowly and avoid excessive sanding.
3: Choose the Right Glue
Contact cement is only suitable for paper backed and two-ply veneer. It's a very common mistake to use contact cement or yellow wood glue on raw wood veneers. Neither of these adhesives dry hard and yellow glue has a tendency to bleed-through. We recommend Better Bond X-Press™ veneer glue since it dries fast, cures hard and requires no mixing. It is made specifically for raw wood veneer and it's very easy to apply.
- Contact cement is only suitable for paper-backed and two-ply veneers. Raw wood veneer (veneer with no backing) should never be used with contact cement.
- Yellow glue should not be used with veneer. It doesn't dry hard and it has a tendency to allow bleed-through. This is the most common mistake in veneering. More information about veneering adhesives can be found by clicking here.
- PPR's and urea resin glues may not be ideal for those new to veneering. They require careful mixing and long press times. And for basic veneering, their only benefit is higher moisture and heat resistance.
- Standard "cold press" veneer glue is often the best choice. We recommend Better Bond X-Press™ veneer glue since it dries fast, cures hard and requires no mixing. It is made specifically for raw wood veneer and it's very easy to apply.
- Heat Lock™ and other iron-on glues can be used on veneer projects that have seams (joint lines) but it takes practice to get it right.
4: Apply the Glue Correctly Always apply glue to the substrate material only. Don't apply glue to the veneer. The easiest way to apply most water-based veneer adhesives is with a simple foam fubber glue roller. These rollers are re-usable and inexpensive. You can get them here on our website.
The key is to apply veneer glue evenly. It should not be dripping wet.
A good test is to draw some pencil lines on the substrate and then apply the glue. If you can readily see the pencil mark on the substrate (through the adhesive), then you probably have applied the right amount of glue. If you can't see the pencil lines at all, then you might have applied twice as much glue as necessary.
Bonus Tip: Veneer can have a tendency to curl up when it is placed on the wet glue layer on the substrate. Do not spray the face side of the veneer with water to counteract the curling. The addition of water to the veneer causes excessive expansion of the wood cells which can cause the veneer to split later in the day as the moisture evaporates from the saturated wood cells.
5: Minimize Warping with a Balance Veneer
One of the most common veneering problems is the tendency of the panel to warp after it is removed from the press. This issue can be greatly reduced by veneering both sides of the panel. A balance veneer is a veneer that is applied to the back side of the substrate. This will even out the stress placed on the substrate as the glue dries and the veneer settles into its final position on the panel. Learn more about balance veneer use on this page.
Large Panels
A backer or balance veneer can be applied to the panel before or after the face veneer. Most vacuum press users will find it easier to apply glue to the back of the panel and press the backer veneer first. Follow the instructions on the glue bottle regarding clamping time. Better Bond X-Press™ veneer glue requires just 60 minutes of clamping time. When the appropriate amount of time has passed, remove the panel from the press and immediately apply glue to the face side of the panel. Then set the face veneer in place and press the panel for another 60 minutes or as described on the veneer glue instruction label.
Small & Medium Panels
Time can can saved if your project calls for a small to medium size panel to be pressed. In this case, both sides of the panel can be veneered at the same time. Simply apply the glue to the back side of the substrate and lay the backer veneer onto that surface. Then quickly move on to applying veneer glue to the face side of the panel. Put the face veneer in place and get it under clamping pressure as soon as possible. Press the panel for 60 minutes or as described on the veneer glue instruction label.
6: Vacuum Press the Panel for Best Results
A vacuum press is the ideal tool for clamping veneer to a substrate because it applies a significant amount of even pressure distributed across the entire surface. Clamps and weights will often work well on a small panel. The key is to make sure the pressure is evenly distributed - which is exactly what a vacuum press does. Otherwise, the glue may create ridges and bubbles in the veneer. This will ruin the panel. Click here for more information about veneering without a vacuum.
7: Allow the Panel to Dry Correctly
Better Bond X-Press™ veneer glue requires 60 minutes inside the vacuum bag to "set", but the actual curing takes another 3 to 4 hours outside of the bag. Be sure to let the panel dry completely before any sanding or machining is started.
Don't leave the veneered panel in the press longer than the glue specifies because it will cause causes ripples and bubbles to form in the veneer. Additionally, panels left in the press for too long can develop patches of mold. We've seen cherry and maple develop mold with less than 4 hours of clamping time.
Ultra-CAT™ veneer glue requires 4 to 6 hours of time inside the bag. It cures through a chemical reaction instead of evaporation.
Panel warping can be prevented by allowing both sides of the panel to dry evenly. Small light-weight panels can simply be hung by spring clamps suspended from rope or string. Large panels can be placed on a flat surface with dowels or PVC pipe underneath to allow air flow and allow even drying of both sides of the panel. For more information, be sure to check out the "Curing Glued Panels" page.
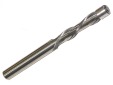 8: Trim the Panel Using the Right Tool
If the substrate was cut to the exact size before the veneer was applied then a flush cutting router bit is typically used to trim the edges. This works very well as long as the edge of the substrate is square, free of voids, and has no dried glue drops that would interfere with the pilot bearing.
Instead of cutting the substrate to the exact size, its usually best to cut the substrate panels one-half inch larger on each side and then apply a veneer that is a half inch smaller (on all sides) than the substrate. I typically line up one edge of the veneer with one edge of the substrate so that the veneer is inside the edge of the substrate by an eighth of an inch. Use blue tape to hold it in place. Once the panel has cured, a table saw with a plywood cross cutting blade can be used to do the final cutting of the panel. Start by cutting the side opposite from where the edge of the veneer was aligned slightly inside the edge of the substrate. Then go back to the other side and trim the panel to its final side.
9: Avoid Sanding Through the Veneer
It is every veneer user's nightmare to have a perfect panel ruined because the sander cut through the veneer. It's no less than instant disappointment when the glue surface becomes visible. Don't let a worry about sanding through a panel prevent you from veneering a project. We've been there and we've learned from it.
Do yourself a huge favor and make a couple of test panels using a softwood veneer like walnut or redwood and a hardwood veneer like maple or bubinga. These panels don't have to be large. Even an 8" x 10" size works fine. Apply the glue to the substrate, press the panel, and let it cure.
Then draw a dozen or more lines across the veneer surface with a pencil. Be sure the pencil lines go all the way out to to the edges of the panel since this is where many sand-through mistakes can happen. Then use your favorite tool to sand the panel. We use a random orbit sander and typically start with 120 grit. Watch the sanding lines disappear and note where they are removed easiest. You will likely find that the edges of the panel are where the pencil lines are removed with the least amount of effort.
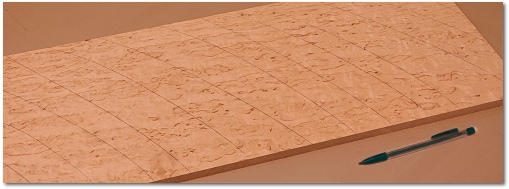
Continue sanding the panel and trying various amounts of pressure on the tool to see how it affects the removal of the pencil markings. You would normally stop sanding when the pencil lines are removed and the panel is smooth, but in this case go ahead and keep sanding. The goal here is to sand down to the glue layer so that you get a feel for exactly how long you can sand before disaster strikes.

In the picture above, we used a random orbit sander (with 120 grit sand paper) for
80 seconds on this spot to sand through the veneer.
Consider making a few of these test panels and test mistakes and with that you will have gained invaluable knowledge that will help you avoid sanding through a project veneer panel.
You can draw pencil lines on every veneered project as a reference for the softness of the veneer. If the line is difficult to remove, then you know you have a hard veneer which will not easily sand through. Also, use the pencil trick to help avoid sanding through if the veneer requires any grain filling or if the raw veneer required a patch piece. You may end up with some light pencil markings on the veneer. These are easily removed with denatured alcohol on a paper towel.
Be sure to check out the JWW Veneering FAQ for more information.
 |
|
 |
|||||||||||||||||||||||||||||||||
All Content ©2026 VeneerSupplies.com™
Terms and Conditions | Privacy Policy | Contact Us
![]()

