






Categories
- Raw Wood Veneer
- Paper-Backed Veneer
- Edge Banding
- Vacuum Press Items
- Veneering Supplies
Shop by
Veneer Species
Build Your Own Vacuum Press

Veneer Supplies Newsletter



How to Cut a Clean Veneer Joint
The easy way to use a veneer saw to cut a tight seam line
It can be a challenge to find highly figured veneers in large sizes, so you may find it necessary to join two or more pieces of veneer together to make a large panel. The good news is that this method can reveal some amazing results that can only be achieved with veneer. There are several ways to lay up a veneer panel. With a few simple tools, the process is not complicated and relatively easy.
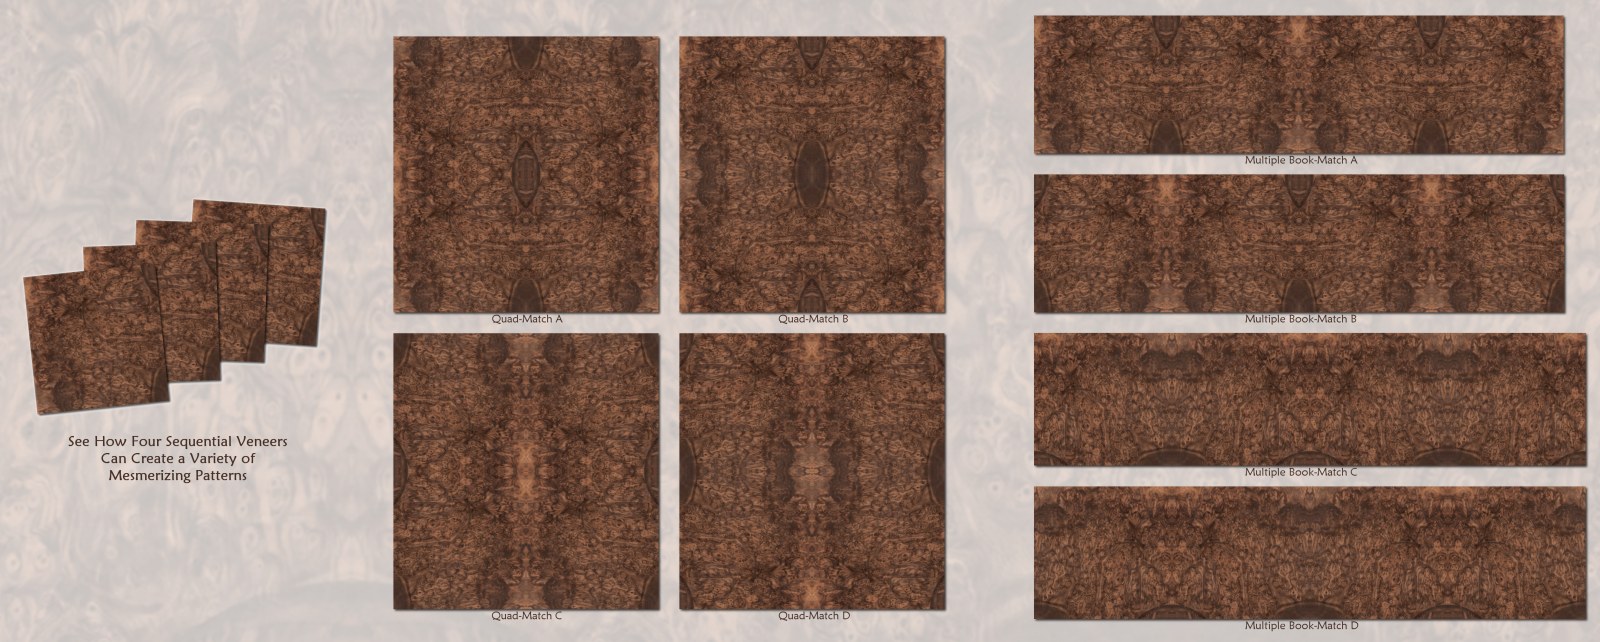
The picture below shows how four sheets of a lesser grade walnut burl veneer can be quad-matched to achieve a kaleidoscopic effect. Even the most mundane veneers offer stunning potential when book-matched or quad-matched. Our Veneer Match-Maker™ software tool can help you visualize a potential lay up.
Part 1: The Veneer Seam/Joint Line
Any number of methods can be used to prepare the veneers for edge joining. The method you choose may depend upon factors such as the thickness/quality of the veneer and the size of the seam. For some joints, you can clamp the veneers between two boards and trim the edges with a flush-trimming router bit, low angle block plane, or even a stationary jointer. Though some woodworkers report success with a razor knife, we've never been able to get a perfect joint line with that technique. The knife tends to split the wood cells unevenly, and it also does not cut a square edge on the veneer sheet which makes the seam line imperfect.
The best jointing method for mill-sliced veneer requires a handheld veneer saw. These saws are inexpensive and very easy to use. Though they are made for right-handed users, many left-handed users will have no problem using the tool.
The saw needs to be properly sharpened, and it should have the correct tooth profile as shown at the bottom of this page. Veneer saws are available on our website, and you can opt for us to hand-sharpen the blade. Alternatively, you can sharpen the saw with the technique described here.
The Straight-Edge Board
The saw is guided by a straight-edge board, and the blade is supported (vertically) by the thickness of it. A piece of 3/4" thick hardwood that has been made true using a stationary wood jointer will work well. For a clean joint line, it is critically important for the straight-edge be absolutely straight and true. MDF and plywood can also be used for straight-edge board, but hardwoods seem to work best.
Tip: A small section of 100 grit self-adhesive sandpaper can be placed on the bottom side of the board to keep the veneer from shifting while being cut. This type of sand paper is often used on disc sanders and is available at most woodworking retailers and some hardware stores.
Using a Veneer Saw to Cut the Seam Line
Start with two flat pieces of veneer. Our website has a short and helpful page about flattening wood veneers. Ideally, these veneers should be used in the order in which they were sliced from the log (this is often referred to as sequential order). Otherwise, the grain pattern in the veneers will not match each other and the lay up will look unprofessional.
The veneers can be laid side by side with one veneer face up and the other face down (with the same edges touching each other). This is called "book-matching". This way, one veneer is mirroring the other. For straight-grained veneers, this minimizes the repetitive appearance of using multiple veneers to lay up a single panel. Book-matching can uncover some very intriguing patterns in figured wood veneers.
Evenly stack two veneers on top of each other with the grain going in the same direction and set them on a smooth and flat cutting surface. The saw teeth will cut into this surface a bit once the veneer has been cut through, so make sure this surface will not damage the teeth. An underlaying sheet of MDF or 1/4" thick plywood is most commonly used for this if the work bench surface is in adequate.
Sawing Technique
- Place the straight-edge board over the "keeper" side of the veneer. In other words, you will be sawing off the waste side of the veneer. The veneer saw is designed to cut on the pull stroke only.
- Start in front of the area to be cut so that the saw blade is already in motion when it comes in contact with the veneer. Place adequate downward pressure on the saw, and keep it pressed flat against the straight-edge. This will keep the saw blade in the vertical position.
- Keep the saw moving past the veneer so that the ends are cut cleanly. Lift the saw off the veneer at the end of the pull stroke and start again from the forward edge of the veneer. It typically takes 4 to 7 passes with most species to cut through a veneer.
Adjust the amount of downward pressure on the saw to control the aggressiveness of the cutting action. Soft veneer species, like walnut, require a considerably lighter cutting pressure. If the veneer at the end of the stroke starts to break off, apply more downward force on the straight-edge board and less downward pressure on the saw.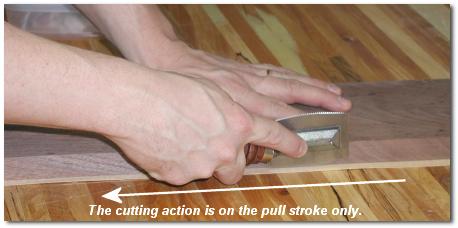
- When the cutting is finished, butt the two veneers together with the cut sides adjacent to each other. The grain patterns in the veneer should mirror each other almost perfectly if the veneers were cut evenly and if the veneers are laid up in the sequence from which they were sliced from the log. If the pattern is off a bit at one side, you may have to cut one or both veneers again.
Pattern Shift Problems
Within a bundle of veneer, there can be a shift or movement of the figure pattern. A slight degree of shift can be expected since no two slices of veneer will ever be exactly the same. There is also a machine-made shift that occurs during the trimming process at the mill. For the veneer user, this means you might not be able to get a perfect book-match just by stacking the veneers directly over each other and make the joint cut.
The solution is simple. After you have determined the desired pattern with the veneers you are using for the book-match, mark the proposed joint line on the first sheet of the veneer set. Use a veneer saw at the line you have drawn and cut the first sheet only. Lay that veneer on top of the next veneer sheet in the bundle so that it is mirrored/book-matched. You'll need to move the veneers around a bit until you see the perfect mirror image at the cut edge of the first veneer sheet. When the first sheet is laid on the second so that there is a perfect "reflection", draw a sharp pencil line on the second veneer. This is your cut line for the second sheet.
Part 2: Taping the Seam
Click here to continue.
 |
|
 |
|||||||||||||||||||||||||||||||||


All Content ©2026 VeneerSupplies.com™
Terms and Conditions | Privacy Policy | Contact Us